Blogger
 Firstly, blogger has helped me keep organised and on track throughout the project, I chose blogger to display my creative journey as it is easy to use and view anywhere. When choosing a blog to display my work, I felt that blogger was best for me because, as a first time blogger I felt it was simple and easy to use. You can also use Blogger on iPads and iPhones which allowed me to always have easy access to my work. This came particularly useful when filming and editing as I could refer pack to my initial ideas and carry out research quickly and effectively. Furthermore, Blogger allowed me to display my creative process clearly and, chronologically so that people could see what I done during specific months and, how my products developed over time. Finally, using blogger during this project has been particularly useful as I could quickly note down ideas then go back later on when I had time and further develop them this is because, blogger allows you to edit previous work without changing the chronological order.
 Microsoft Excel
 During the planning stages of my project I used Microsoft Excel to make a simple and effective gantt chart that I could easily follow throughout. I found using a gantt chart very successful as I could follow a basic plan that included all the tasks I had to complete and, within the specific time frames. Also, with Excel I could go back and edit the time frames for when I fell behind with tasks or needed more time to complete tasks such as, filming and, editing. Overall, I think creating a gantt chart was key to my success in meeting the final deadline as, I carefully planned out what tasks I needed to complete from the beginning to the end of the project.
 Microsoft PowerPoint

YouTube
When researching I also found You Tube particularly helpful for finding exsiting Title

CanonEOS 1100D
During the construction stages I chose to use the CanonEOS 1100D to film my final title

Green screen
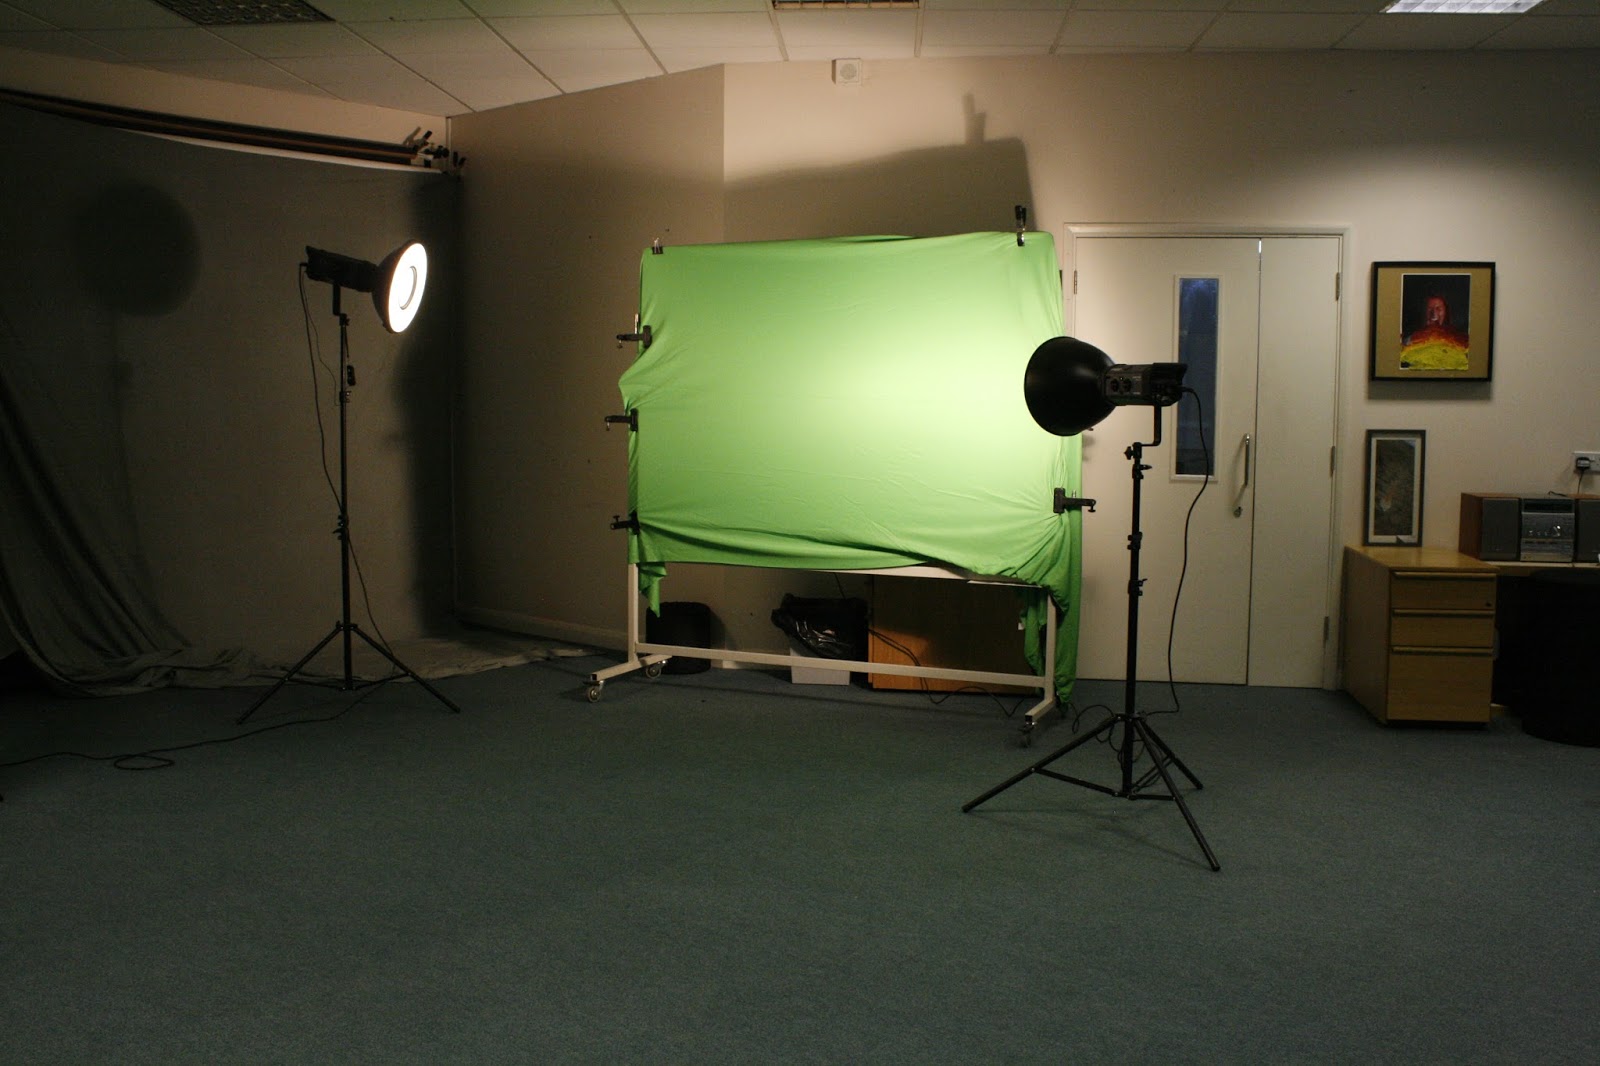 During the construction stages of my project I also used the green screen for the backdrop of all my videos.This is because, during the experimentation stages of my project I found that using green screen technology for my backgrounds was more effective than lots of different locations as they clearly highlighted the time travelling theme that I might not of been able to recreate. At the beginning of the project, green screen technology was very new to me, I had never used it or even thought about using it before, when I found I had access to it I thought I would experiment just to see what the out come is like and, how easy it is to use. With the help of iMovie I found it very easy to use and, highly effective which is why I chose it to use in my final title sequence. With this technology I like how you have the freedom to choose any back drop you want and, I found this very effective for my title sequence as I wanted to create the sense of time travel with lots of different backgorunds. Without green screen the filming for my title sequence would of been very long and laborious as I would of had to keep changing location, I would of also had to find and, research lots of different locations that clearly highlighted what decade the children were in.
 iMacs/ Macbook
 When it came to downloading and editing footage I used my own MacBook instead of the ones on offer at school, this is because, once you download the footage and start editing you must stay on the same computer therefore, I didn't want to be restricted to only editing at school. Downloading the videos onto my own macbook gave me greater freedom as I could edit whenever I had some spare time. Without being restricted to only editing at school also, meant that I could spend more time focusing on small details that I may not of noticed in the busy, hectic school environment. I chose to use MacBooks and iMacs instead of Windows PCs as Apple offer a wider range of editing softwares such as iMovie, iStudio and, LiveType that helped me achieve a more porffesional and appealing end product.
 iMovie
 As the construction stages developed I chose iMovie to create my title sequence because, I could trim,combine, and speed up my original video clips. iMovie also offers a variety of other features that other editing softwares don't offer for example, green screen technology and ken burns which allowed me to crop the background in my clips. iMovie also, offered features such as 'picture within picture' that allowed me to follow typical title sequences conventions, this resulted in a more professional and accurate title sequence that is similar to exsiting media products. Finally, I chose to use iMovie for the construction of my title sequence as its precision editor allowed me to make sure my title sequence flowed effectively which resulted in an appealing and execrating title sequence.
LiveType
 To further enhance my title sequence I used LiveType to construct a memorable logo for mytitle sequence. this software allowed me to experiment a create a logo for my title sequence that moves as it offers a variety of different effects such as, the barrel jump. Before this project i hd never used this software but, i quickly got used to it as it is very simple and easy to use. I felt this software was crucial to the construction of my title sequence as it allowed me to follow the title sequenece conventions of the the eye caching logo a the end of the sequence. once i had made my logo it was easy to save snd import into iMovie to use and felt overall it was highly successful and works well in my sequence.
Photoshop
Whereas, I used iMovie to edit my videos for my main task, for my ancillary tasks I used

iStudio

 Finally, during the construction stages of my ancillary tasks used the publishing software iStudio. Like, Photoshop Elements I also, used iStudio last year to make my music and school magazines. When I began using iStudio last year it took me a while to get used to and, I think this became apparent in my final products. However, this year I feel a lot more confident in using this software and, I feel my skills have enhanced to create overall a more professional looking products.I chose this software as it allowed me to create layers within my magazine so that I could overlap images and sub stories. iStudio also offered a variety of different textures filters for shapes, I chose the washed out letter fill as I feel that it tied in well with the WW2/evacuation theme. This therefore created a more professional and effective DVD cover, I also used the same fill on my magazine cover so that they tie in together. Finally iStudio allowed me to fit my images to specific shapes so that I could create the overall split image that I wanted.
 Evaluation stages
During the evaluation stages I have used both Blogger and Microsoft Word to write and reflect on my project. Through this stage I have used blogger to reflect and look back on my project and how my work developed throughout the eight months. At the beginning of the project I chose to use blogger as, it displayed my work chronologically, this has been useful during the evaluation as I could quickly find certain tasks I had completed during certain months and reflect on my progress. I also, used Microsoft word to type up all my work as it spell checks my work and I can quickly read back through and correct mistakes.
This is most easy question to answer because we all know uses of these media technologies so it is very easy for us to write something on these.
ReplyDeletePhD dissertation writing service